
Understanding Your PBS System is important because this is your business. This is the Nucleus of your Money Generator. They key to understanding how to create a System that will work for you is essential. And by that we need to have Quality Content on our pages.
The video below will give you an Overview of what your PBS System is all About: If you do not remember this video, you may want to watch it again.
This is a World Class – State of the Art System Not Seen Anywhere Else
Understanding Your PBS System and what PBS stands for:

PBS is the acronym for Performance Blogging System, which is your website. It is a blogging system that is set up through WordPress. The PBS is a WordPress template that we use to create our pages in the system. This page will help you in understanding your PBS System. First of all when you get your new PBS system you will get your login credentials from your Instructor. This will be given to you in your email. When you open the email it will show:
- 1. Your Username (usually your first name)
- 2. The URL (your 4 character domain) otherwise, your website address that you would give to the public to view your PBS system.
- 3. The Dashboard URL, with the /wp-admin behind it. This is your Administrative URL (what you will use to get into the back office to perform the administrative duties in your System.
- 4. Your Password. This you want to make sure you save somewhere safe.
How to Login to your System…
You first want to copy the password in your email, making sure there are no spaces before or after. Then click on the URL (Uniform Resource Locator) next to Dashboard. This will open a new tab and bring you to your login page. Here you will enter your username, and then paste the password that you copied into the password field. Be sure to click the box that says: Remember me. Then click login. After you login to your system you will land on your Dashboard; As well as what we refer to as your Back Office or Administrative Office.
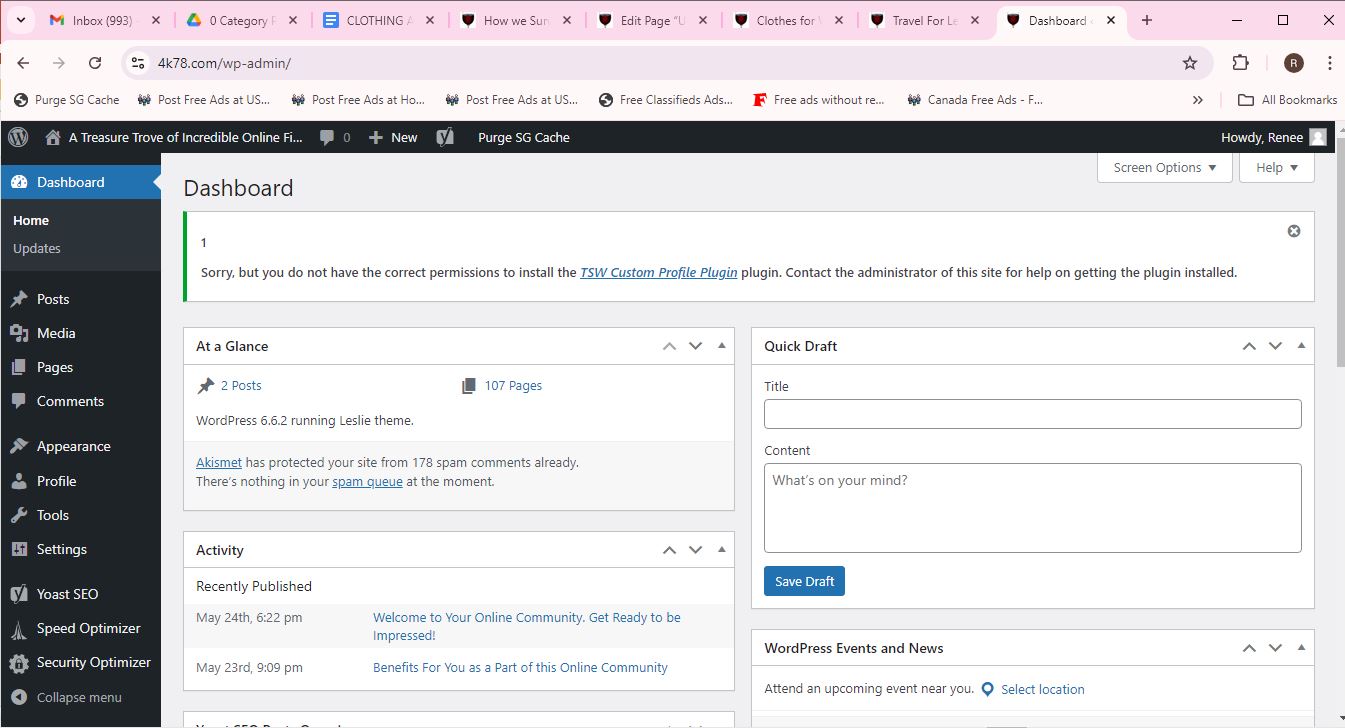
The first thing everyone notices is the message stating: “Sorry, but you do not have the correct permission to install the TSW Custom Profile Plugin. You Are To DISREGARD This Notice. It will always show when you are in your dashboard. Remember it is a WordPress template that we are using to modify. As you will also notice in the dashboard that your PBS is already equipped with 2 Posts and 76 pages. These 2 posts and 76 pages are what you will be modifying, including the Contact Us page. As far as the Disclosures Page, You are NOT TO Modify this page. The only thing you will change on this page are the two links highlighted in blue. You will change these links to replace the 1f16 with your 4 character URL. This is a proprietary legal page that is required to exist, so DO NOT MODIFY this page.
Understanding your PBS System and How to get to the Public View from your Administrative Back Office.
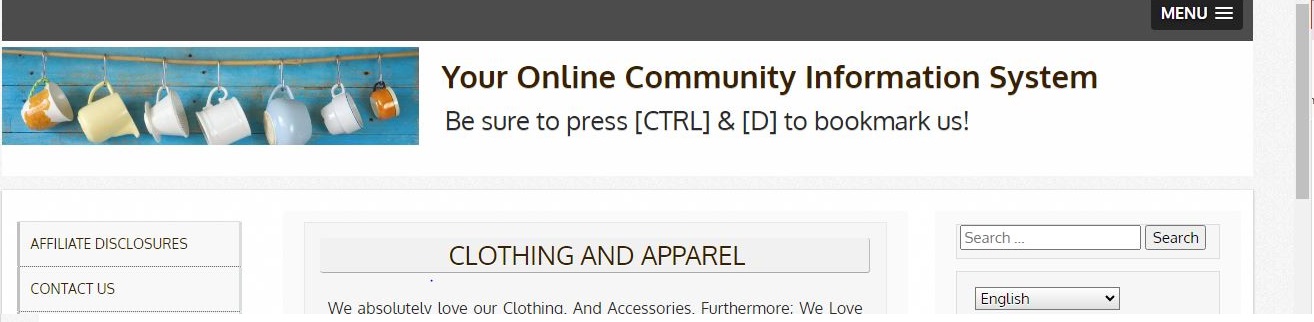
As you can see on the left hand side, there is a black area with a menu in it. In order to see the public view as the administrator, you must click onto the Site Title located next to the blue house icon at the top left hand side of your dashboard above this menu (above Dashboard highlighted in blue). This brings you to your Home Page. If you notice at the very top of the page shows the title of your PBS system (website); And the line right under that is the Tag-Line of your PBS just as shown below.
Understanding Your PBS System (Website) Title:
- Site Title: Your Online Community Information System
- Tag Line: Be sure to press [CTRL] & [D] to bookmark us!
Make sure you keep this in mind. You will see this on the top of every single page in your PBS system. You can change these to whatever you would rather them to display as. To do this please follow the steps below:
- Go to your dashboard
- Click on Appearance in the menu on the left side in the black area, midway down the menu.
- Then click onto Customize
- After that Click Site Title
- You will see two boxes that have the current title and tagline in them.
- Delete the current information and type in what you want it to be in the site title box and also in the tagline box. You will also notice it shows on the right side as well so you can see how it actually appears.
- Last, click on Publish in the blue box.
- Then hit the back arrow on the top left of the page to get back to the dashboard.
- Click on your new Site Title now to get back to your Home Page.
Where do I Start after I login in to Learn the Basics?
Just to give you a quick overview of your System. When you start modifying pages to make it your own, as being the Author. This is the key to understanding your PBS System. This particular website: 1f16.com is the sample website for new students to go by. It is also handy if you lose a page before it is backed up, this is where you will go to copy that page and then modify it. It has happened to a few students, I am sure. Therefore it is good to keep this website in mind, just in case.
1. Begin by Modifying the first 4 Pages of the Menu:
You will first begin with the first three pages: Affiliate Disclosures, Contact Us and the Home Page. The Home page contains your two posts. Therefore, you will actually be modifying first, the two pages and the two posts on your Home Page.
2. Modifying your Anchor Offer Pages:
Next You will start with the Anchor Pages: Anchor #1-Velovita, Anchor #2-The PBS Vortex and Anchor #3-Savings Highway Global. You will modify these pages first. I know it seems logical to start at the first tab, Arts & Entertainment. But trust the System. As Rory says: “It’s a System, Not a Suggestion”. So be sure to listen to your instructor and do not go off on your own tangent.
There are 8-10 pages for Velovita, as well as 8-10 pages or more for the PBS Vortex and also 8-10 pages for Savings Highway Global. You can see a list of these pages towards the bottom of this page. On your Offer page you want to begin with the first sentence or paragraph. And work paragraph by paragraph until you are done. When you come to a heading you want to modify those as well. The same is said for the bullet-points. Do them one at a time making sure to keep the same format.
At the point where you begin modifying your pages, your instructor should be teaching you how to post ads. It is very important that as soon as you have completed modifying a page, and have confirmed that the content is 100{6e9a5bdc4bd135f3d44820670d7538a8c56fc4df5f76010b59776dbba954ed3e} Unique, to post your ads for that page. And every page thereafter. As soon as you finish modifying one page, post your ads for that page. I repeated that intentionally because it is important.
3. Generating Traffic while Modifying your Offer Pages:
If you want to be approved for Google AdSense you must have a Huge amount of traffic going to your website. This is why you start posting ads when you modify your pages starting with your first Offer page. This way your traffic is increasing with each page, deeming your PBS worthy of Google placing their ads on them. Therefore, you should be continually posting ads daily. We will talk about posting ads further down the page.
4. Modifying the Rest of your Pages:
After you complete the Anchor Pages, then you will start on all the other pages beginning with Arts & Entertainment and down to Travel (All Things Travel). By now you should be well acquainted with modifying pages to the point that you are doing it without quillbot.com. But if you still prefer to use it, that’s fine. When you get to the Kiosk pages for RAM (Cash Network Direct), you DO NOT ADD the following pages until after you are approved for Google AdSense. And these pages are:
- Golden Monk
- Kratom
- MIT45
5. Modifying the Category Pages:
Once you have completely modified All of your Offer Pages, It is now time to modify your Category Pages. If you don’t know by now, your Category Pages are the pages you land on when you click to tabs in the Menu. You will modify these pages just as you did the Offer Pages, paragraph by paragraph until completed. Then be sure to backup the pages in your “0 Category Pages” folder in your Google Drive.
6. Modifying the All Things Category Pages:
The All Things Category Pages are the similar pages as the Category Pages. These pages are what is viewed in mobile devices like your Tablet or Mobile phone. They look almost the same but shall be modified individually. When you modify the All Things Category Pages you will also backup these in the “0 Category Pages” folder as well in the Google Drive. They should have the exact same Titles except “All Things” will be in front of it.
7. Adding Extra Pages to your PBS System:
Once you have finished modifying all of your pages; The next thing is to add 5 – 10 pages of your own. In order to get Google AdSense, you will need to add these pages by putting yourself into them. Google wants to see original and unique content, some personal pages. These can be recipes which they love, travel experiences, your hobbies, instructional how to pages and so forth. They should not be selling pages, just informational pages with your personal touch.
Understanding Your PBS System Page Title or Post Title:
The title of your page is the Title of that particular page you are on and ONLY that page. It is the only Title that is displayed under the Site Title and Tag-Line, and it is underlined. Please understand the difference and do not get these mixed up. As you see in the example below the Title of this category page in the image is CLOTHING AND APPAREL. We hope this helps you to a better understanding of your PBS System.
“VERY IMPORTANT – DO NOT MODIFY The Titles of your Category Pages and Offer Pages, unless your instructor tells you to. And only then is when they should go through it with you. Never change the Title of the Page on your own. The only reason for this, as you may notice, is that on some Category pages the Title of the Offer does not match the Title on the Offer Page. These should always match. For instance as you see the title in the image below. This should also be the same name in the list of offers in the Category Page. To clarify more click onto the image to see the whole page. You will see the Offers:
- Clothes for Women – Affordable Fashion
- Clothing She Will Love
- Functional Scarves with Pockets
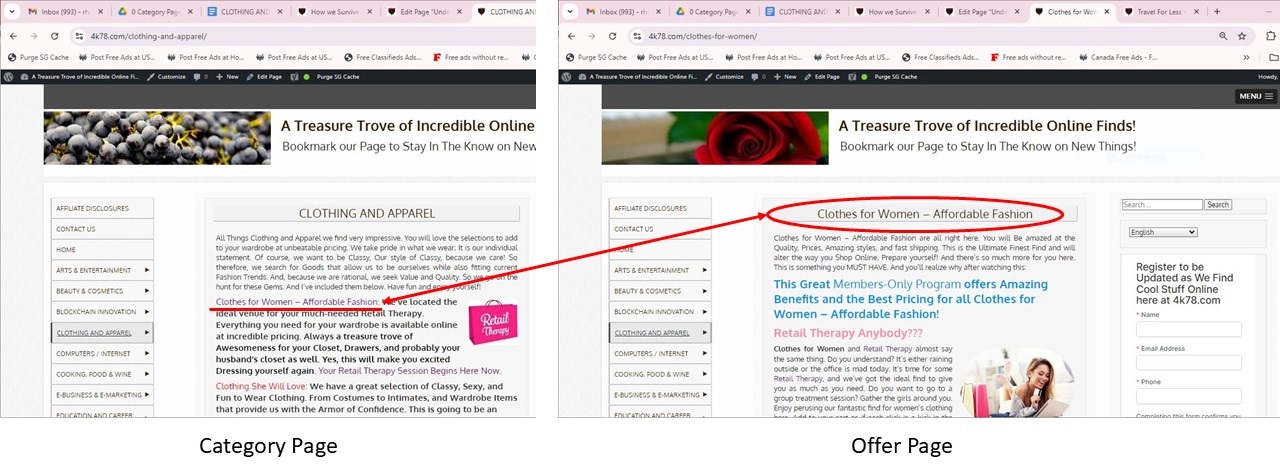
When each of these links are clicked and it takes you to the offer page, and the offer page title must have the exact same title that is listed in the category page.
Let’s begin Understanding your PBS System with your 2 Home Page Posts.
Once we modify these two Posts, we will not have to create anymore posts. From then on we will be modifying Pages. And any additional pages that we write we will add as Pages. The two Home page posts are titled as follows:
- “Welcome to Your Online Community. Get Ready to be Impressed”
- “Benefits for You as Part of this Online Community”

First of all, with the WordPress template that we use Google requires us to have two posts on our Home page. It is only on the Home Page that you will see the two posts. Unfortunately, many students get very confused about the posts. Some can’t seem to understand that there actually are 2 separate posts, One above the other one on the same page (The Home Page).
However when you edit the individual post you will not see the other one until you go back to the public view of your page. The post that should always be at the top is the one titled “Welcome to Your Online Community. Get Ready to be Impressed”. The way to ensure this is to make sure when you edit the publish date of the post, that the date is more current than the other one. This way it will always display at the top. Another way is to click on the “sticky” toggle button of the post you want on top. Anytime you edit either of your posts, when you go back to public view the page will not display properly. To fix this just go to your dashboard and then back to public view again. Then it will display properly. This is the case only with the posts.
Modifying the Pages and Understanding your PBS System:
NOTE: As you are modifying your pages keep in mind the certain words that Google does not like to see on your pages. In order to be Approved for Google AdSense, we cannot use these words in our pages. If they appear in your pages then just replace them with another similar word. Words such as:
- Deal or Deals
- Discover or Discovery
- Discoveries
- Discovering
- Sale or Sales
- Save or Saves
- Savings
How to Edit a Post or Page:
To enter edit mode to modify your post or page. You will click on “Edit This” on the bottom of the post. This takes you into edit mode. On any other page you will also have the edit option at the top of the page. Once you are in edit mode you can type right onto the page. ‘Don’t ‘waste time or create more work writing it out first and then copying it onto your page. Just type directly onto your page from the beginning and keep going from there. You can modify the page using quillbot.com (the paraphraser); Or you may just modify it on your own, in your own words.
You know when you were in English or Language Arts class and the Teacher instructed you to rewrite your sentences in a different way? That is exactly what we are doing here. This is your canvas to produce your own creation using words instead of paint. But, by all means go ahead and use quillbot.com if you prefer. After a while the more you work on your pages the easier you will find it to modify the paragraphs in your own words.
Once your page is fully modified, you will want to click on the Save Button in the Blue box on the top right hand side above the right panel. In order to change the date you must click onto the date next to Publish, when the calendar appears, choose the year and the month then the day, then click Save. In order to exit the edit mode, you will click Save and when the Black rectangle pops up on the bottom left, click on View Page or View Post. By doing this, you will change back into the Public View of the page.
Using Quillbot.com to help modify your pages:
Open another tab in your browser and type in quillbot.com. If you are not familiar with what a tab is, they appear just like tabs of a manila folder. You will see these above your address bar on your computer screen. When you click on the plus sign at the top of your screen, a new tab will open. And this is how you open a new tab. Now that your new tab is open, you will type in your address bar: “quillbot.com”. Create a free account on quillbot.com. Do not sign up to pay for the service. Just use the free account.

Of all the icons you see the first one should say Paraphraser. Click onto that and it will open up the paraphraser (as you see in the image on the left). Now go back to your PBS page, which is the tab that has the top part of a wine glass on the left of it. When you click on it, your PBS page will open. Start at the top of the page, with the first paragraph. DO NOT modify the Title. Highlight the first paragraph, copy it. Now, go to the quillbot.com tab (by clicking on it) and paste what you just copied into the left side. Click the green button underneath that says paraphrase. This will start the paraphrasing process. You will see that it creates a new paragraph on the right hand side. Now, highlight and copy your new paragraph on the right side.
continuing on…
Go back to your PBS page (by clicking on the tab) and paste it onto the page in front of your original paragraph you are modifying and press enter. When you press enter, this separates the paragraphs from each other. To avoid any confusion. Now is when you proofread the new paragraph and make sure it is still saying what you want it to say. Because quillbot.com is an AI tool, it has no feelings, and therefore, it can sometimes take your content out of context.
So be sure to proofread the paragraphs to be sure they are not taken out of context. Also be sure to capitalize or bold certain words or the replaced words like they were in the original paragraph. If there are any links, be sure to copy them back into your new paragraph as well, or change them to your own links. Your instructor will tell you where to find them.
and repeat…
Then start on your next paragraph and do the same. This time when you go back to quillbot.com, you will delete what is on the left side and paste your new paragraph you want to paraphrase. You will repeat this process for all your paragraphs and headings, one after the other until your whole page is completed. Now it’s time to change the copywriting needs paragraph. Then backup the Page. This will be explained further down the page.
Changing the Meta Description
After your page is completely modified. Go to your first paragraph and copy the first 1 to 3 sentences. Delete the meta description and Paste what you just copied into it. The bar underneath it should be green. If it isn’t, remove the last sentence. If it still doesn’t turn green you may have to play around with the wording until it still makes sense and is green. Then go back to the first paragraph and make sure it matches the Meta Description.
Understanding the SEO and Readability:
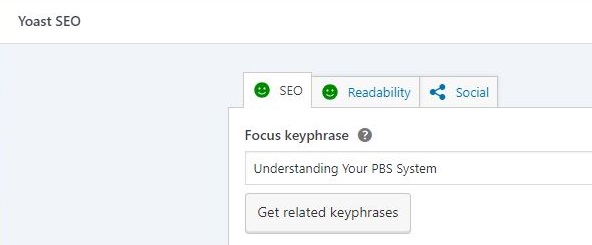
After you have finished modifying the page, you want to check the SEO and the Readability. The two faces should be green and green smiley faces as you can see in the image to the right. This will change from time to time as you are writing your page. So, don’t bother trying to fix this until your page is completely finished. Then, and only then, is when you want to see 2 green smiley faces. If it is not green and green by then, that will be the time to correct things.
What Happens when you get Red or Orange Angry Faces?
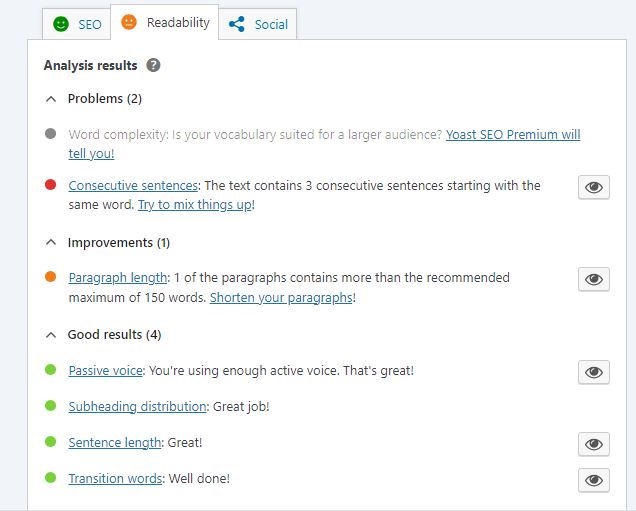
When you get red or orange angry faces then your SEO and or Readability is not good. In this case in the image to the left it shows that the Readability is not good. If you click onto Readability it will show you a list of what needs to be fixed. If there is an eye next to it, you can click on it and it will highlight in purple the paragraphs or sentences it is referring to.
To check the SEO, if you scroll down a little to where it says SEO Analysis and click on the drop down arrow, it will then open up the box with a list of what needs to be fixed there. Once this is all fixed then and only then do you want to backup the page. If it is a new page then this is when you want to publish it. To accomplish this, you just click Publish. When it asks you if you are sure, click Publish again and your page is now live.
Copywriting Needs Paragraph:
This is your Signature Contact Us paragraph that is required by Google to be on both of our Posts. and All of the Offer Pages. You must put this paragraph through the Plagiarism Checker when you first use it to be sure that it is Unique to You. After that there is no more a need to check it for plagiarism. You also want to make this a heading H4 and align it to the right. There should be a contact us link going to your Contact Us Page, in two parts of this paragraph. Be sure this is on the bottom of ALL your Pages, EXCEPT for the Category Pages, the Affiliate Disclosures and Contact Us Pages.
Now Let’s Discuss Understanding your PBS System with the TWO different TYPES of Pages:
- Category Pages
- Offer Pages
Understanding Your PBS System Category Pages:
Category pages are like indexes in a book. Another way to put it is like File Folders in a filing system. This is the navigation system of your PBS. They are the Titles in the Tabs listed in the Menu on the left of all the pages in your PBS system. When you click onto any TAB on the alphabetized MENU starting from ARTS & ENTERTAINMENT down to TRAVEL (ALL THINGS TRAVEL), this is the navigation that takes you to the actual CATEGORY PAGE. Category pages DO NOT have a copywriting needs paragraph (Your signature Contact Us paragraph required by Google).
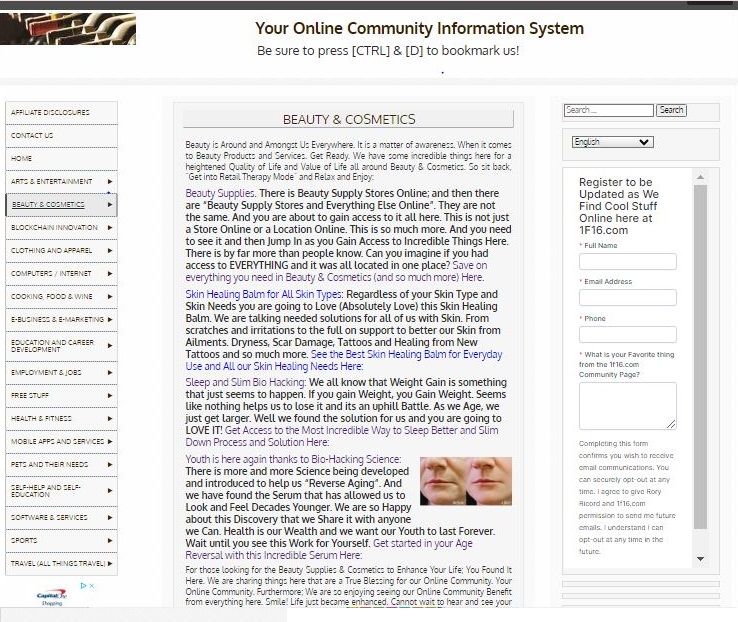
The format of all category pages is one paragraph at the top and bottom. And in between the top and bottom paragraphs are all Heading H3 Paragraphs. Each of these paragraphs will start with the name of the Offer Page. This will have an embedded link that will take you to the actual Offer Page. Following with a short summary describing the offer (They all are Heading H3, which makes them appear bold). Then a call to action sentence at the end of the paragraph.
The call to action sentence will also have an embedded link (blue lettering & underlined) that also takes you to the same Offer Page. Notice the example of a Category Page in the example picture shown above. Any images shown on the Category Page must be small like a thumbnail and aligned to the right. Don’t forget the Category Page is just an index so no big pictures here. DO NOT MODIFY CATEGORY PAGES UNTIL YOU ARE FINISHED MODIFYING ALL OF YOUR OFFER PAGES.
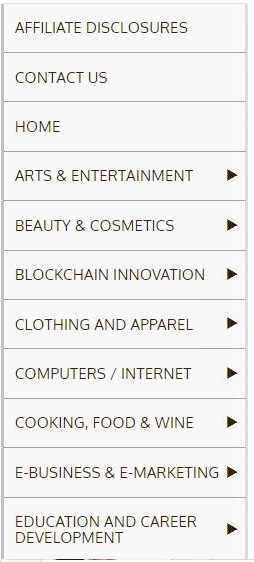
Listed Here are some of the Category Page Titles:
- ARTS & ENTERTAINMENT
- BEAUTY & COSMETICS
- BLOCKCHAIN INNOVATION
- CLOTHING AND APPAREL
- COMPUTERS / INTERNET
- HEALTH & FITNESS
- SOFTWARE & SERVICES
The All Things Category Pages:
The All Things Category pages are the Categories for the Mobile Devices such as smartphones and tablets. These pages are simply to help navigation for mobile devices. Therefore the All Things Category pages had to be created to accommodate these devices. These are the pages that appear in the drop down menu next to the Category Page. This is the page that would be shown on these devices. These All Things Category Pages must also be modified. They however, must appear the same as their sister Category Page, but must be modified with different wording. It is best to use the same identical pictures as well. If you click the three lines next to Menu on the top right of your PBS page it will show you the Menu for the mobile devices.
So just as the list above of the Category Page Titles; Below is a list of those same All Things Category Page Titles:
- ALL THINGS ARTS & ENTERTAINMENT
- ALL THINGS BEAUTY & COSMETICS
- ALL THINGS BLOCKCHAIN INNOVATION
- ALL THINGS CLOTHING AND APPAREL
- ALL THINGS COMPUTERS / INTERNET
- ALL THINGS HEALTH & FITNESS
- ALL THINGS SOFTWARE & SERVICES
Understanding Your PBS System Offer Pages:
Your Offer Page is your Selling Page. Evidently, this is where you talk about the particular Offer or Service provided by the Offering Website in detail. It is your opportunity to explain to the consumer why it is essential for them to purchase this product or service. However, here is where you want to be able to connect with the consumer reading your page and gain their trust to keep them as a customer.
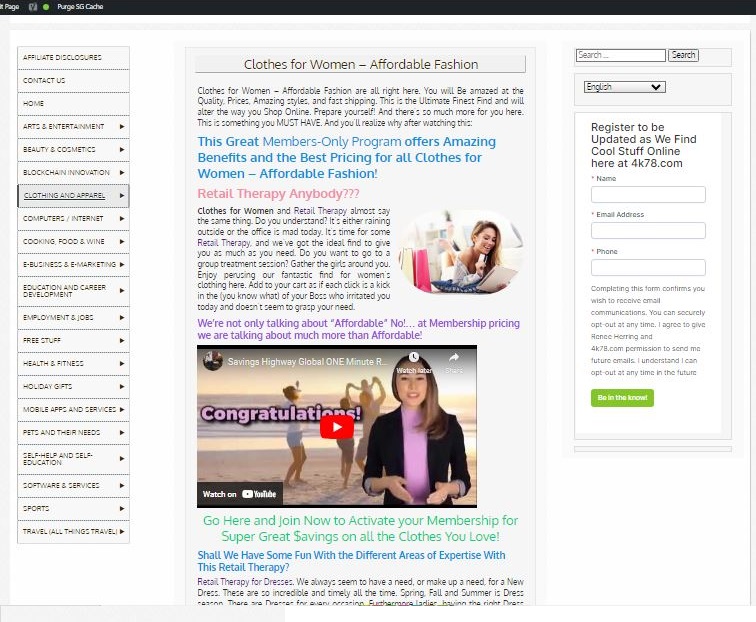
The Offer Page will have an introductory sentence or sentences at the top of the page. You want to describe here what your customer should expect to read about. This, however, should be more of a pique your interest type of sentence or sentences. And you also want to use this for your Meta Description. (we will talk about that later). We are all striving to be approved for Google AdSense. Therefore, we must follow the protocols of what Google AdSense wants to see on our pages. With that being said, you will also need to have a summary paragraph at the bottom of the Offer Page. And underneath that, you need to have a Copywriting Needs paragraph on the bottom of ALL YOUR OFFER PAGES.
Understanding your PBS System and The Meta Description:
The Meta Description should always be the same as the first one to three sentences of the page depending on how long or short they are. This is part of the SEO that will help drive traffic to the page. This is the most important (catch phrase), therefore you want to choose your words to pique the interest of the reader. You should copy these one to three sentences into the Meta Description, making sure the bar underneath is green. If it is not, then adjust it accordingly. Once it looks good and the bar is green, then make sure it matches the first few sentences of your page. You want to make sure you do this on all of the pages in your PBS System (Except for the Affiliate Disclosures Page).
Understanding your PBS System and Adding Headings inside your PBS Pages.
When adding Headings on your page they should indicate what is expected to be read in the following paragraphs. They are usually H2, H3 or H4. Headings always appear to be Bold. However, when you insert a link inside a heading do not Bold it because the heading already makes it bold. If you bold the characters in a heading it will actually do the opposite and un-bold it. You should always give your headings a color. This gives life to your page. Never add an image next to your heading; If you do so, your image will be unclickable. You always want your image to be clickable; Therefore, Always put your image either below the Heading or somewhere in one of the paragraphs.
Understanding Your PBS System in Adding Images, Videos and Additional Paragraphs:
Adding Images
As you notice in the picture above, depicting the Offer Page there is an image above the video. There should be at least 2 or more images on all of your Offer Pages, depending on how long your page is. However, Videos are not counted as images. One image should be added for every 300 words, no less, and Google wants them to be either aligned to the left or right side. Not in the middle! Also, you do not want to make them too big, so you are not competing with Google’s advertisements. You also want to have an image depicting what you are talking about in the paragraph you place it in.
How to add an image:
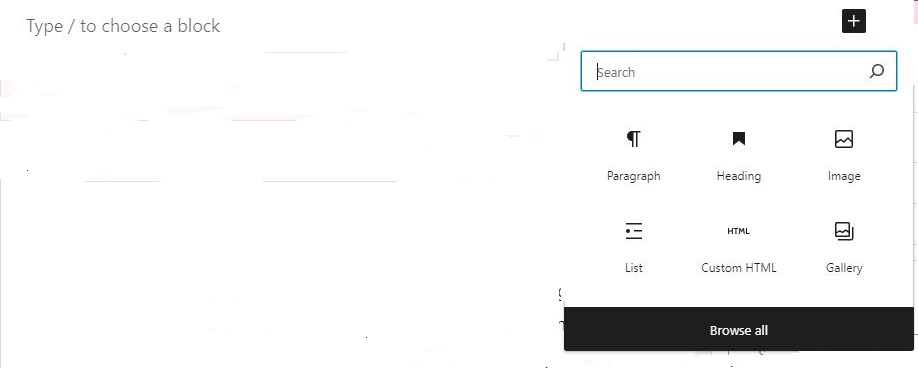
To add an image, simply place your cursor behind the text where you want to place the image and press enter. A new line will appear and you will see the words “Type / to choose a block”, (as shown in the image below). To the right of that, you will see a black box with a white plus sign in it. Press on this and a box will open. Click on the image icon.
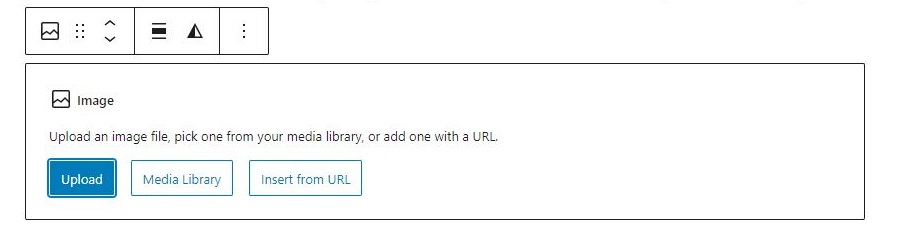
Once you do this another box will pop up and you want to click Upload (As you see below, highlighted in blue). This opens up another box where you will choose an image from the picture folder the image is located in inside your computer.
Aligning and Adjusting the image:
After your image is added you want to align it either to the left or right. To align the image, click on the three lines next to the triangle as shown in the image above. Then choose align left or align right. Never in the middle. Then adjust it to make it smaller if need be. This is done by clicking on the image. Doing this should outline the image in blue with little circles on the side and the bottom. Just put your cursor on one of these circles and push in to decrease the size of the image. After the image is added you may leave it as squared or you can round it if you prefer. Just choose rounded in the right hand panel.
Managing the image:
Be sure to also fill in the Alternative text box in the right hand panel right under the option to round it. You want to enter text containing your key phrase or keyword (can also just be the key phrase). When adding an image you want to always make sure it is not lined up beside the heading. If it is next to a Heading, you will find out that it is not clickable. Just move it up or down to get it away from the heading.
Every image should have an embedded link and be clickable. This is another navigation tool. When you add images to your Offer Pages you want to stagger them, aligning them from left to right. This is to help with the appearance of your page. However, on the Category Pages you will align all images to the right. Never align an image on a Category Page to the left.
Finding images to use:
This is where you may choose the images that Rory has in his Dropbox. If you do not have the link to Rory’s Dropbox make sure you get it from your instructor. If you do not see any pictures you want to use here, then you may go to google.com and in the search bar put in what you are looking for. Press enter and then click on “images”. Here you will see plenty of images to choose from.
Keep in mind that you may not choose any images that are copyrighted, have a patent or license number or are licensed. You also may not choose any that have a company name, watermark or a pattern in the background. You do not want to be sued for using someone ‘else’s image. However, any image that says “this image may be subject to copyright is fine to use. This only means it may be subject to but it’s not.
How to delete an image:
To delete an image you would click onto the image. When the edit box appears, click on the three dots to the right side of the edit box. Then scroll down to the bottom and click delete.
How to Add Videos:
You also want to make sure you have a video on all your Offer Pages. If you do not have a video already on your page, you may want to go to Youtube.com or Google to find one. You preferably want one from the company that manufactures the product. And you want to put it closer to the top of your page. Videos are excellent in grabbing the attention of the reader. They usually can’t resist hitting that play button. This way the product or service is pretty much self explained in the video.
When adding a video, you first want to get the embed code of the video you wish to use. To get the embed code of the video, just right click on the video. When the menu window opens, click on where it says embed code and copy it. Then you want to paste it on the page in edit mode where you want to place the video. Just as you would add an image, it is done the same way. Only instead of clicking the image icon, you will click Custom HTML code and paste the code in the box. And you always want to make sure the size of the video is 560 in width by 316 in height. Just look inside the HTML code to adjust the size if you must.
How to delete a video:
To delete a video is the same way you would delete an image. Click onto the box with the HTML inside. When the edit box appears, click on the three dots to the right side of the edit box. Then scroll down to the bottom and click delete.
Adding Additional paragraphs:
We are fortunate to have Rory give us a great starter with more than half the contents on all of our pages. I understand that in the earlier days there was just a blank page and you had to come up with something on your own from scratch. Now you have a great start with the pages that come with your PBS System. All you have to do is modify the words and add some more paragraphs of your own to get up to 1000 words on each of your Offer pages (Not your Category Pages). It is important to have a heading separating the paragraphs of 300 or more words. And it’s always good to give them a color (Rory prefers Blue). This separates the paragraphs and gives a sense of direction on your page, making it easier to read.
When you have at least 1000 words this shows Google pretty much that you are educated on the subject and know what you are talking about. This is why you need the extra paragraphs. And it is in these extra paragraphs that you can add your personal story of your experience with the product or service. If you don’t have any personal experience, use someone else’s. Or you can go on the Offering website to the About us section and read about the company. A lot of times they will have some really great useful information to share. People usually act on someone else’s opinion. So, if you sound sincere about your experience then they tend to connect with you and purchase from you. You then may have attracted a life long customer.
Below Here are some of the Offer Page Titles:
- Entertaining Gifts and Supplies
- Nutrient Dense Beef
- Beauty Supplies
- Skin Healing Balm for All Skin Types
- Brainfood is the Best Homeschool Program
- Blog with Rory
- Teach from Home and Get Paid Your Worth
- Boost Your Online Marketing
- Residual Affiliate Marketing
- Travel for Less
Understanding Your PBS System and the Links on Your Pages.
There are two different types of links that we use on our pages and they are.
- Inbound Links
- Outbound Links
Inbound links are links that lead back to a page within your PBS. For instance when you have a contact us link in your page; this leads the reader back to your contact us page in your PBS. It is taking them to a page that is still inside your PBS. INBOUND LINKS we use mostly on the Category Pages. Why, because these links take you to the Offer Pages of your PBS. Still inside your PBS. And these ALWAYS open in the same tab, because your customer still has the ability to navigate in your PBS via the menu.
Outbound links, however, lead to the Offering website. For instance, links that take you to Savings Highway Global, Velovita or one of your Kiosk Offer websites such as Sholdit, Miel Healing or Sneak A Squeak. Because these are links leading to websites outside of our PBS; these are what we call OUTBOUND LINKS. And these links must open in a new tab. So when you add the link in your edit box you will always check the box that says to open in a new tab. Which means that a new tab will open up beside the one you are currently in so your customer always has a way to get back to your PBS website.
How to insert a link into your page:

To insert a link in your paragraph, you simply highlight the words that you want to embed your link into. Then in that rectangle edit box that appears above or below, first click the B to make it bold. Then click the chain link icon. This will open a box that will say “Search or Type URL” inside. This is where you will type in or paste your link. Make sure you always start with “https:// followed by your 4 character URL .com/ then whatever the page or website you want it to navigate to. Very important, make sure you Do Not link your keywords.
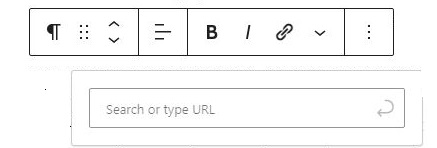
For instance if you wanted to link to another page in your PBS such as the Beauty Supplies Offer page. Then you will type in”https://7k48.com/beauty-supplies”. Then you click on the Curved Arrow to apply it. This saves the link in the edit box. Then click Save on the top of the panel on the right and this will save the changes made on the page.
However, if you are adding an outbound link then you will most likely copy it from the source and paste it into the edit box. Make sure you click the little drop down arrow to the right of the box and choose to open it in a new tab, then click the rounded arrow to apply. Any time you insert a link into your page, you ALWAYS want to go to public view to make sure it is working properly. Be sure to check every link on your page to make sure they are all operating correctly.
How to insert a link on an image:
Simply click on the image. You will notice an edit box appear above the image click on the link. When the edit box opens, click on the pencil to the right of the box. Then paste or type in the URL of the link you want to insert. Make sure you click on Open in a new tab. Then click on the rounded arrow to apply. After that be sure to click save on the top of the right hand panel.
Understanding your PBS System and Checking for Plagiarism:
After you have modified the page from top to bottom, you need to make sure the content is 100{6e9a5bdc4bd135f3d44820670d7538a8c56fc4df5f76010b59776dbba954ed3e} Unique. To do this we go to the Plagiarism Checker. Your instructor should have sent this to you via email. If there are sentences that are plagiarized, then you would correct them. Keep repeating the process until you are showing 100{6e9a5bdc4bd135f3d44820670d7538a8c56fc4df5f76010b59776dbba954ed3e} Unique. Just in case you do not have a plagiarism checker, here are three:
- 1. https://smallseotools.com/plagiarism-checker/
- 2. https://www.paperrater.com/plagiarism_checker
- 3. https://www.grammarly.com/plagiarism-checker
Understanding Your PBS System and Why it is Extremely Important to Back Up Your Pages
As you finish modifying each page and you have no plagiarized content, then you should Back Up the page in your Google Drive. It is very essential that you backup every page in your PBS System. Why, because there are hackers out there who are looking to steal our traffic. They do this by hijacking our website. This has happened to me twice already. Had I not backed up my pages then I would have had to do them all over again from scratch. This can be very time consuming and damaging especially if you already have ads posted. You should have been instructed by your Instructor how to back up your pages. However, we will go over that with you here.
Understanding your PBS System and How to Use Google Drive to Back Up your Pages:

In your google drive, You should have a backup folder. To get to your google drive you would go into your email account dedicated for this business. If you look to the right of your screen (also in the image on the fight), you will see nine dots next to the circle with your initial in it. Click on these nine dots, then click Drive. From there your google drive will open up, then look on the left side menu and click My Drive. If you have not already created your backup folders, now is the time to do it.
Understanding your PBS System and How to Create your Backup Folders:
On the top left hand side in the white box that says: + New. Click on this box and choose “New Folder”. Type in your 4 character URL Backup (ex: 7k48.com Backup). Then click on Create (this saves the folder). Now, double click on this folder and create backup folders with the names of ALL of the Categories (in the Menu of your website). Google automatically alphabetizes them. Then you will create seven additional folders. These folders shall be named as follows:
- 0 Affiliate Disclosures Contact Us Home Page Posts
- 0 Category Pages
- 0 Copywriting Needs
- 0 Uncategorized Pages
- Anchor #1 Velovita
- Anchor #2 PBS Vortex
- Anchor #3 SHG
Understanding your PBS System and How to Create your Backup Pages:
All of the Anchor Pages will go under the appropriate folders. You will double click onto the appropriate folder that you want to place your page into. Then click on + New in the white box on the top left. When the menu opens click Google Docs. As soon as the page opens, press the enter key twice. Then Type exactly as follows: (without the bullet points). Yes, you want to type these all in Uppercase.
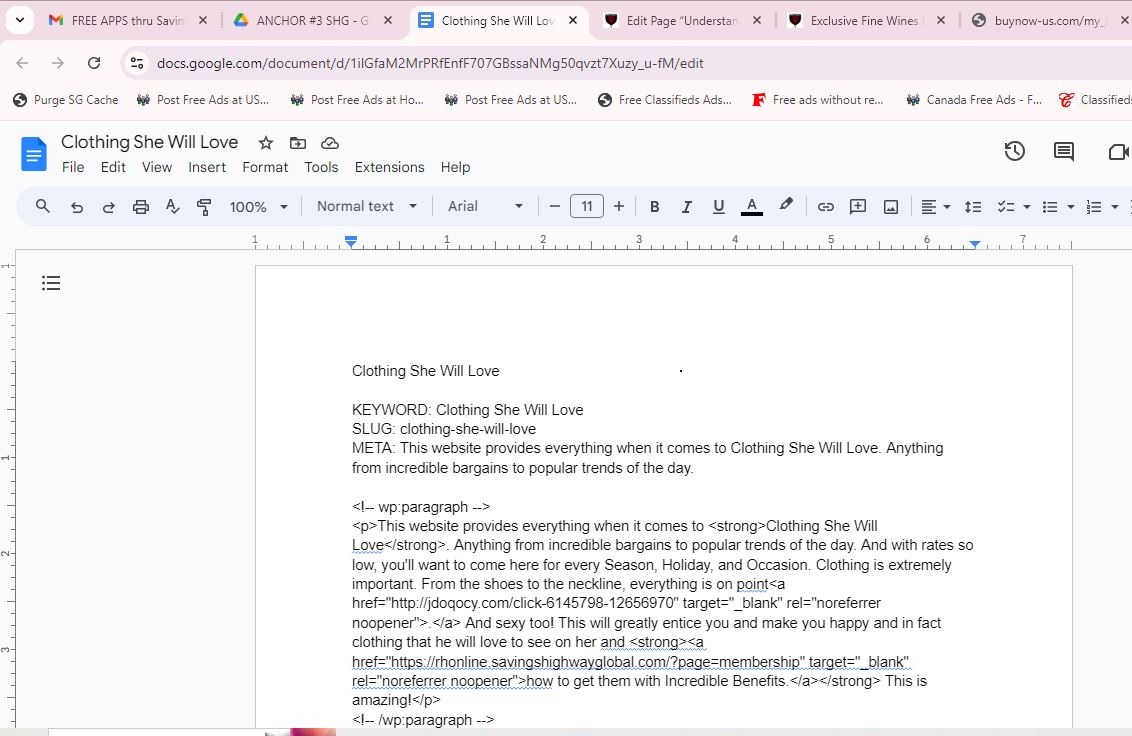
Page Title (paste here)
- KEYWORD: (paste here)
- SLUG: (paste here)
- META: (paste here)
Page Content HTML (paste here)
See an example of a google doc backup page in the image to the right. The reason you hit enter 2x is because you want to leave the top line for the Page Title of the PBS page. Once your google doc is set up, you will copy the Page Title from the PBS page and paste it on the top line in the google doc. Then click onto the top left that says: Untitled Document. Doing this will automatically fill in the Page Title here. Then you will copy the key phrase from the PBS page and paste it next to KEYWORD: in the google doc.
a few tid bits
You will notice the keyword or key phrase as it shows on the PBS page is uppercase and lowercase letters just as the page title is. Then copy the Slug from the PBS page and paste it next to SLUG: in the google doc. Here you will notice the slug is always all lower case lettering and each word is separated by hyphens. Next, copy the Meta from the PBS page and paste it to the google doc backup page right behind META:. Keep in mind that you always want to have a space after the colon. See the example.
Now copy the page content
To copy the page content, go back to your PBS page and click on the three dots to the right of the Save button in the top right hand panel of the page. Once it opens up, look about two thirds down the list and click on Code Editor. This will change the page content into HTML code. Copy everything in the box from top to bottom. Then go back to the google doc and paste it in 2 lines under the Meta just as it is shown above.
There is no option to save the google document. Google automatically saves it. Just leave it for 2-3 minutes then you can click on the x on the tab to close the page out. Anytime you make a change, even the slightest change you want to back up the contents of the page again. And you always want to copy the HTML code into the google doc. To get back to the normal view in the edit mode, just click on “Exit Code Editor” in the blue lettering at the top of the page left of the right hand panel. Now to exit edit mode, click save and when the black rectangle box appears on the bottom left, click “view page”. This takes you back to the public view of your page.
NOTE: I know you think certain pages should logically go under certain Categories. However it is instructed by Rory to put all the Anchor Offer pages in the appropriate Anchor Folders.
Velovita pages will go into the “Anchor #1 Velovita” Folder such as:
- Biohacking for A Healthier You
- Biohacking with A Lite Mist
- Brain Enhancement to Win
- Brainfood for Us All
- Coffee
- EMF Protection
- Gut Health with Byom
- Sleep and Slim Biohacking
- The Simple Way to Lose Weight
- Youth Serum for A Younger You
Your “Anchor #2 PBS Vortex” Folder should contain the following Pages:
- Best Homeschool on the Planet
- Blog with Rory
- Brainfood Academy Education
- Brainfood Academy is the Best Homeschool Program on the Planet
- Education Gets a Major Reboot with Brainfood Academy
- Exclusive Fine Wines Delivered to Your Door
- Is College Worth it?
- New Schooling for Our Children is Here
- PBS – Performance Blogging System
- Teach from Home and Get Paid Your Worth
- Teachers Can Earn Thousands A Day with New Incredible Solutions Platform
- Teachers of Brainfood Academy
- The Book Marketing is Freedom
- Wine Magic ( the newer PBS’s will not have this page)
- Work from Home with Link Post Blogging
The following are the Pages for Savings Highway Global “Anchor #3 SHG”:
- Beauty Supplies
- Clothes for Women Affordable Fashion
- Clothing She Will Love
- Food Food Food
- Free Apps that Pay You Save You Money
- Savings And Benefits
- See How Thousands are Turning their Smartphones into Cash Creators
- Travel for Less
- Unlock the Secret to Savings on Monthly Expenses with this $20 Life Hack
Backing up Your Category and All Things Category Pages:
Your Actual Category Pages and All Things Category Pages will go into the “0 Category Pages” Folder. So when you are ready to back up these pages. Double click the “0 Category Pages” Folder. Then click + New, and then Google Docs. And backup your Category and All Things Category Pages in here the same way you did all the Offer Pages.
Understanding Your PBS System and How to Manage the Menu:
When you login to your PBS System you will be in your dashboard. However, if you are already in your system on one of your pages, then you would just click onto the dashboard on the top left of the page. Here is where you manage the menu for your PBS System. On the menu in the black area on the left, click on Appearance. Then click on Menus.
Your Dashboard (Administrative Back Office):
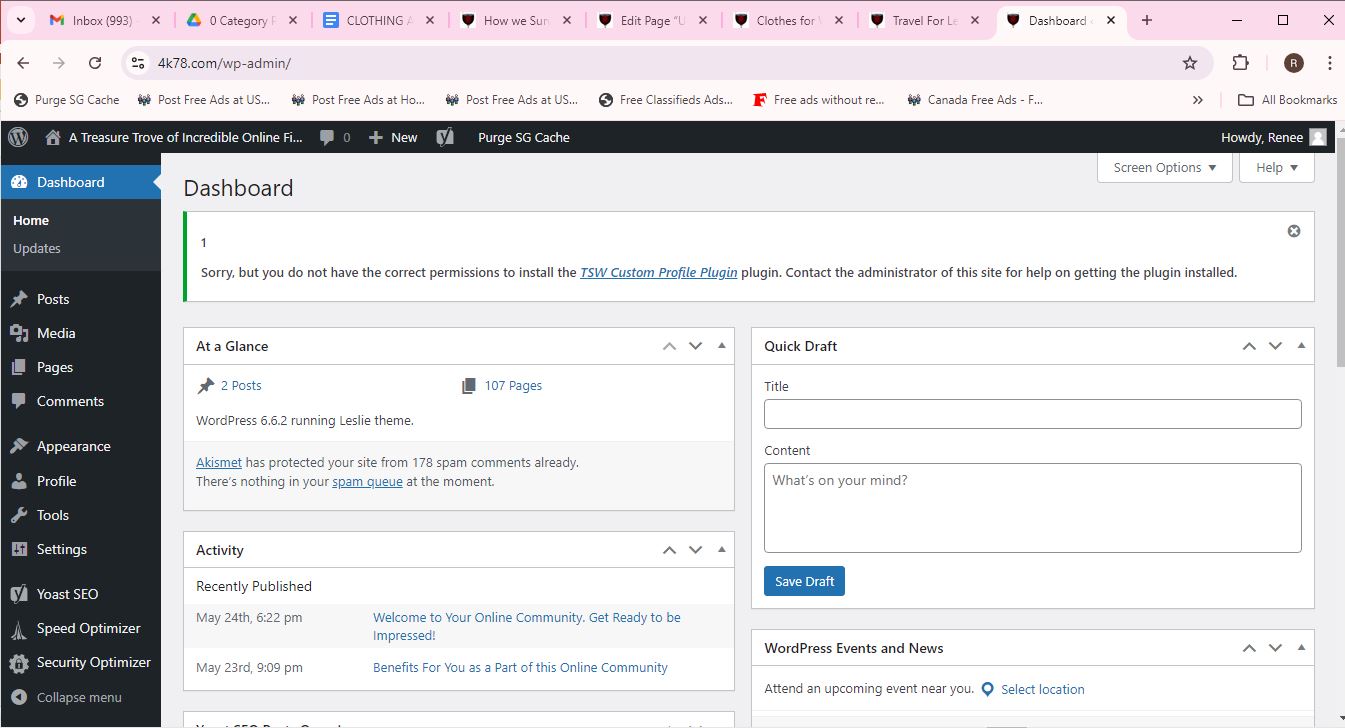
Here is where you would add pages for the titles to appear in the drop down menu of your PBS System. We will explain below how to add and move pages inside the drop down menu. That is the the black box that has the All Things Category page on the top of the list,
Understanding Your PBS System and How to Add a Page to the Menu:
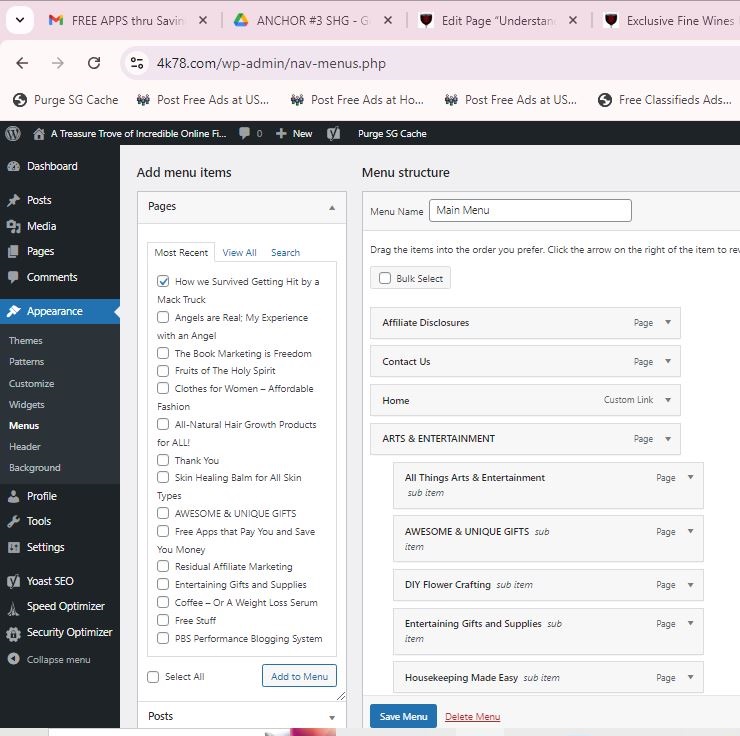
To add a page to the menu, you click on appearance, menus, then in the list (as you can see to the right) find the page title that you want to add to the menu. Usually it will have the most recent pages listed on the top. However if it is not a recent page you are looking for, then click “View All” on the top and search for the page you are looking for. They are listed in alphabetical order, so if you do not see it on the 1st page of the list, click the 2nd or 3rd page until you see the page title. Click on the box next to the appropriate title, as you can see in this example in the image, and at the bottom of that list click on Add to Menu.
then…
After that, look to the right of the list and scroll down to the bottom of the menu. You should see the page title that was added at the bottom. Then you drag that page title up the menu to the appropriate Category you want to add the page to. The Category Pages are more to the left as you can see. However the Offer Pages are a little to the right and are shown as sub items. And these must appear in alphabetical order as well.
When you do this make sure you line it up with the other page titles and that it says sub item. Once you have it in place, click the Save Menu button. This is done to make sure the drop down menu is displayed properly on your website. Keep in mind that the All Things page title must be at the top of the drop down menu for each Category Page. This is the menu that shows in your PBS. Everything listed on the drop down menu should show the same as on your Category Page in the same order.
How to Delete a Page from the Menu:
To delete a page from the menu, just go to the page title in the menu and click on the drop down arrow. Once it opens up click remove, and then save. This only deletes it from the menu, not from the PBS.
Understanding Your PBS System and Why you Must Add Additional Pages:
After you have completed modifying your Offer Pages and Category Pages, you will add your own pages to your PBS System. This is required by Google to have 5 to 10 pages of your own to be approved for Google AdSense. These are personal pages about you, not sales pages. They can consist of Recipes, personal experiences, or How to pages giving information and or instruction on different subjects.
How to Add an Additional Page to your PBS System:
Adding a New Page to your PBS System can be done in more than one way. One way is on the top bar of any page you are on, click on + New (right next to Edit Page). Then choose Page. You have to be very careful not to choose Post. The other way is through the dashboard. In the black menu area click on Pages and then Add New Page. When your new page shows you want to Type in the title of the page.
Then type in the Focus key phrase (which is usually the same as the title or is a part of the title). Type the Slug (if it is more than one word, it should have a dash between them). Then type in your Meta Description. This is more of a catch phrase sentence; or sentences to pique the interest of the reader and entice them to read more. This same sentence or sentences should be the first paragraph of your new page. Then start typing your content adding Headings and images throughout.
How to Delete a Page from your PBS System.
There are two different ways to do this. First you can go to the page itself and in the right hand panel you can click “Move to Trash”. Or you can go to pages in the dashboard menu. Choose the page from the list by clicking the box next to the Page Title. Then hover the cursor over the title and click on Trash.
Understanding Your PBS System and How to Manage the Pages:
There is a quick way to see all your pages in your PBS System to make sure the Yoast SEO and Readability are both green. To get to see all your pages; from your dashboard, click on Pages. To get to the rest of the list at the top or the bottom you can click the arrow to get to the next page in the list.
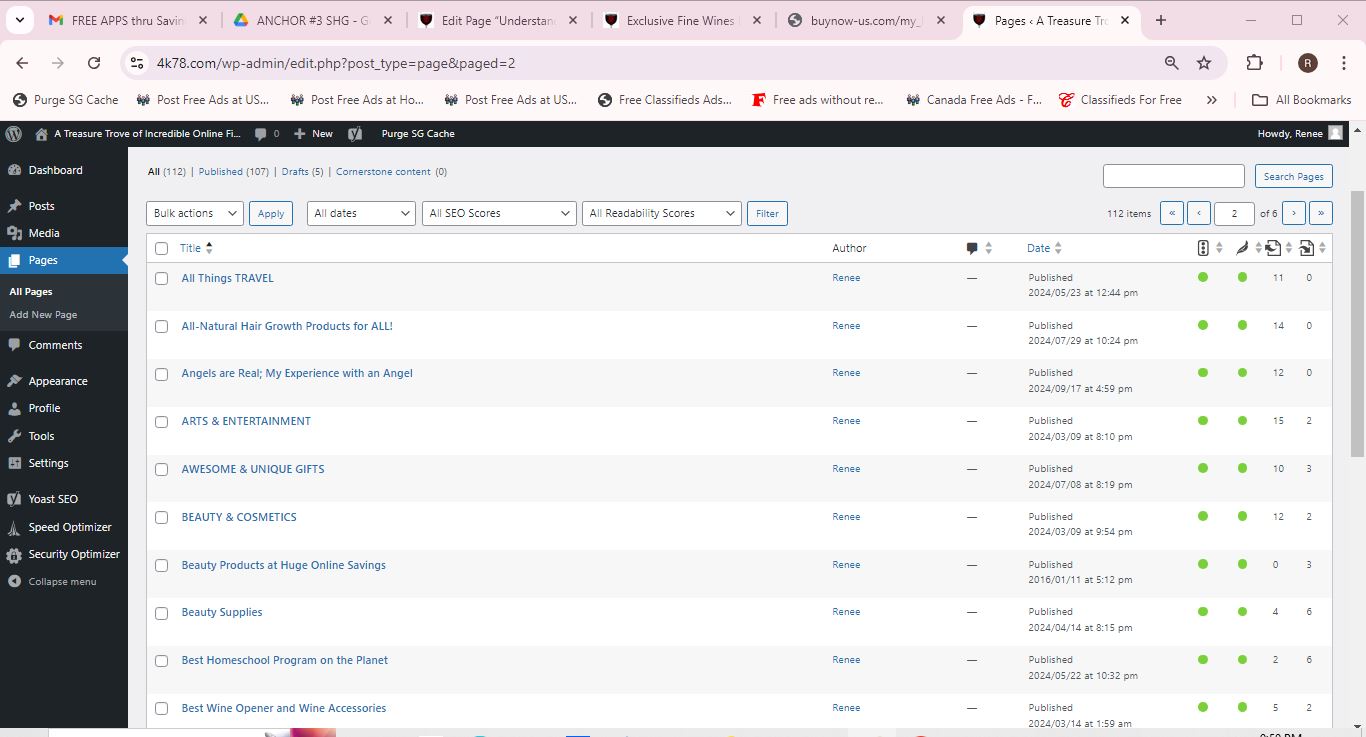
continuing on…
As you can see on the page it shows the Page Title for each page, the Author’s name, Publish Date, the two dots (that should be green) for the SEO and Readability, then the number of internal and outgoing links on that page. If you notice any dots that are not green then you need to go to the page and fix it. To do so, hover your cursor over the Page Title, and you will see options to Edit Trash or View the page. Click on view to open the page. Then you can edit the page and scroll down to the Yoast, SEO and Readability to fix the problem(s). Just go through the whole list to make sure all your pages are green and green.
We hope that this has given you a better understanding of your PBS System and how to modify it. Most students get very confused because it is all new and foreign to them. This is the reason we came up with this page so that we may give more clarity and insight to the new students. Remember, if you get stuck or don’t understand something, be sure to contact your instructor. No question is dumb, no matter how big or small. You want to also stay plugged in to all the zooms and study halls. They are put in place to help you along the way to building a very lucrative and successful business.
======= ***** =======